Using 7-Zip for Windows

Using 7-Zip on Windows to create an encrypted container.

Installing 7-Zip on Windows

7-Zip can be installed on your University supported Windows desktop via the Software Center. Alternatively, if you are on a self managed machine, it can be downloaded from the manufacturer's website. 

Creating an encrypted Zip archive

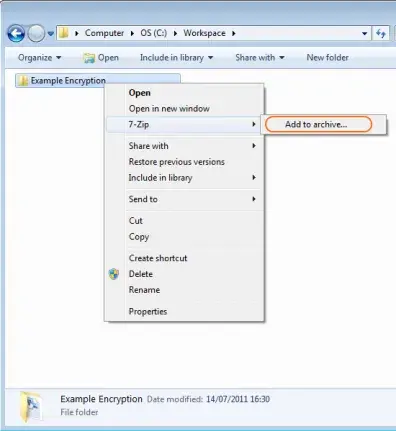
Right-click on the file or folder you want to add to an encrypted archive. Select 7-Zip, then Add to archive…


Select 7-Zip, then Add to archive - menu screenshot
Change the Archive format to zip or the format that has previously been agreed with any sharing partner.
 
 
Change the Archive format to zip. Screenshot

Change the Encryption method to AES-256.

 
Enter your chosen password for the encrypted archive
Enter your chosen password for the encrypted archive. This should be a strong password.


Re-enter the password to confirm.

Click OK.

The encrypted zip archive file will be created in the same location as the original file or folder. It can now be sent securely via email as an attachment.

Use a medium other than email to transmit the password to the intended recipient - ideally phone or face-to-face.


Extracting an encrypted Zip archive

Right-click on the zip archive. (Note: If you received the zip file as an attachment, save this to a folder first, then right-click the file.)

Right-click on the zip archive.

Select 7-Zip, then Extract files…

Select the destination for the extracted files. Enter the password.

Click Ok. Your files will be decrypted and extracted to the location you previously specified.

 Enter the password

Related Links